Prep for 2017
Summary:
- Swap Pedal box out of existing car with spare set from 160 donor vehicle
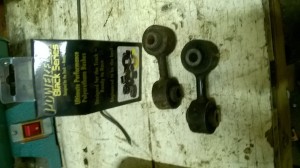
- Change the outstanding OEM suspension bushes with PowerFlex Black ones. – £112.00
- Fit the new Towing straps as per regulations. £65.00
- Fit a new pair of front Dunlop tyres. £10.00 (Raffle Entry), New Rim £25.00
- Fit longer wheel studs, new bearings and 10mm spacers to the front. Studs £17.00, Spacers £10.00, Bearings £34.70, 12.5mm Drill Bit- £10
- Procure and fit a new set of wet tyres. £253.56
- Replace sump seal (Oil and Filter) – £26.59
- Magnacor Leads – £39.81
- Green Rattle Can Paint – £15.00
- Original Gearbox, check, rebuild, seal – £155.00
29th March – Bumper on, side skirts cleaned out, stickers removed and grommets fitted inside
22nd March – Fettling
15th March – Tyres
1st of March – Straps
1st to 22nd February – Wheel spacer debacle
18th and 25th of January – Replace rear beam bushes
4th January – Remove Sidebars, seat and seat mounts to get access to the pedals.
Prep for 2016
The off season plan in preparation for next year is to re-shell the car after the Snetterton Incident.
| Item | Supplier | Cost | Postage |
| Car – RY52 VKV | Gumtree Ad | £150.00 | £0.00 |
| Front Subframe Beam | eBay | £20.00 | £13.00 |
| O/S/F Driveshaft | eBay | £20.00 | £0.00 |
| Roll Cage Mounts Installation, Seam Welding | PrepTech UK | £440.00 | £0.00 |
| 1 Litre Green Cellulose Paint | eBay | £17.95 | £4.99 |
| Harness Plates x 6 | eBay | £11.34 | £5.88 |
| Anthracite Rattle Can | eBay | £14.99 | £0.00 |
| Bonnet Pins | eBay | £5.49 | £0.00 |
| Lime Green Rattle Cans x 2 | eBay | £19.08 | £5.99 |
| Dunlop Direzza DZ03 205 50 R16 | H P Tyres | £690.00 | £27.00 |
| Headgasket | eBay | £19.99 | £2.00 |
| Radiator | eBay | £48.50 | £0.00 |
| PowerFlex Brake Reaction Bar Bushes | Brown & Gammons | £51.69 | £0.00 |
| 16” Hairpin Alloy | eBay | £28.00 | £0.00 |
| Oil Filter, Oil, Manifold Gaskets, Alternator Belt | Essex Motor Factors | £59.00 | £0.00 |
| Steering Fluid, Brake Fluid (5.1) | Local Garage | £13.00 | £0.00 |
| Side Graphics | eBay | £14.49 | £2.50 |
| TechTrader Decals & Name Sticker | Demon Graphics | £30.49 | £5.00 |
Prep for 2015
The off season plan in preparation for the 2015 MGCC Trophy Championship is in a nut shell to do the following:
- Get a new MSA Approved roll cage fitted – Done
- Do the head gasket and bottom rail on the new engine – Done
- Replace the coil packs – Done
- Change the centre pipe and back box – Done
- Fit the new Poly Bushes to the front roll bar – Done
- Change the tyres to ones with a softer compound – Done (Yokohama Parada Spec 2)
- Remove ABS and fit a brake bias valve to the cockpit – Done
- Machine out the weld on the manifold and get brazed – Done
- Remove further excess sound deadening and bracketry – Done
9th September – New Rear Tyres
OK, so have saved for another pair of Yoko’s for Oulton Park, plus a set of CV boots!
15th June – New Front Tyres
Donington highlighted the difference in the Yokohama’s in the dry compared to the Toyo’s in the wet so the budget will stretch to two for the front for Silverstone. Need to save for another pair.
4th March – Bushes Installed and Brake Fluid Test
So to complete the bush installation, I use a hack saw to cut a slither out the remaining outer case of the pressed in bush. The tap it out with a socket – a file off of any burred edges then the new bushes can be pressed in using the vice.
Then they are back on the car using a trolley jack to help lift the hub back into place.
The next step is to fill the braking system with Dot 5 fluid, I then bleed them through and get a pedal which is a good sign. I then move the car and their is a little puddle of fluid under the centre T piece – not a good sign. I nip them up and leave to see if this does the trick. Have decided to attempt Mallory Park so I am hoping its not going to take too much to sort now.
1st March – Bush Fire!!
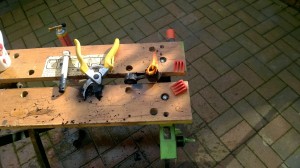
So I got the old roll bar link bushes off and to put in the newly aquired Poly bush black ones I have to get the old pressed in bushes out. This involves a blow torch, to burn off the rubber, I achieve this in the garden on the trust workbench!
23rd February – Brake Pipes Complete
The rear brakes are the main objective of the evening, this is straight forward after I run the pipe through the hrater cable hole and make a bracket up for the Bias valve. I use the holes from the old roll cage bolts in the rear arches just made larger to accommodate the brake ends.
I need a new battery for the blue ZR I am going to sell, so I decide it can have the race car one and I’ll get a lighter one for the race car. Not the lightest available but light enough for my budget at 6.5Kg as opposed to the 14Kg the original one was.
15th February – Finish the Manifold
The manifold needs the weld to be removed internally so I started Christmas time but need to complete it. This is done with the Dremel and some Cobolt Burrs
11th February – Brake Lines
Now the system is removed in go the front brake pipes, there are two feeds off the master cylinder one will do the front and one will go into the cockpit and do the rear brakes. The fronts are first to be tackled.
4th February – On the button
So armed with a battery its off to see if we can get combustion, one turn of the key and away she goes thank goodness for that! Now for the brake system and that is the job I haven’t been looking forward too. Out with the old (well new technology) as the ABS unit is removed…
28th January – Neurosurgery
So its a night of putting the head back on the car and refitting, done this before once or twice but that can make you complacent so I need to check and double check everything. Its all back together and I have left the battery at home, so starting is next week!
25th January – Lap after Lap
A night of lapping in the valves, we used to call this one for the YTS boy when I worked at the garage, but I don’t have that so its old school engineering time and a night in front of the bench lapping in 16 valves.
14th January 2015 – Off with his Head
The third head gasket but first for this engine, the head comes off and is sent off to ELB Engineering in Sudbury for a quick skim. Ideally I need to make time for valve lapping in next week to be thorough so we’ll see how time goes.
7th January 2015 – Exhausting
A bit of juggling here, I need to take the centre pipe and original silencer off the race car and put on my blue ZR 160 saloon as its centre pipe is rotten and the Janspeed box on its in excellent condition so I want it for the race car. I have a new (to me) straight through centre pipe to go one with the Janspeed rear box.
- 1st Step – Put race can on ramp, with new bucket seat fitted (see below LOL) and remove centre pipe and rear box.
- 2nd Step – Put blue ZR 160 salon on ramp, cut of rust centre pipe and bin and carefully remove Janspeed box. Then fit the race cars original centre pipe and rear exhaust section to the car. A quick weld up of the broken front pipe exhaust bracket while we are in there and that car is done.
- 3rd Step – Put race car back on ramp, hang on rear box and new centre pipe and then tighten. Spot the rear box is now hitting the body, take the centre pipe off and bend but not enough then run out of time so put it all on with a view to fettling later!
3rd January 2015 – Lightening
Started to remove the excess sound deadening and brackets with a cold chisel (Thanks for the Tip Ian Boulton) and a spot weld drill.


